Introduction
NGINX is a powerful and versatile web server with many advanced functions. One prominent use is a reverse proxy server, where it receives requests from clients and forwards them to one or more backend servers.
The strategic positioning helps improve web server performance. It enables NGINX to manage incoming traffic, improve website security, and distribute the workload across multiple servers.
In this article, you will learn how to set up and use NGINX as a reverse proxy.
Prerequisites
- Access to a root or sudo user account.
- Access to the command line or terminal.
- A package manager (such as apt).
How to Set Up NGINX as a Reverse Proxy
Refer to the detailed steps below to install and set up NGINX as a reverse proxy.
1. Install NGINX
Ensure NGINX is installed on the server. Follow the steps below:
1. Update the apt package repository list:
sudo apt update2. Install NGINX with the following command:
sudo apt install nginxWait for the installation to complete.
3. Check the NGINX version:
nginx -v
The command outputs the NGINX version, indicating the installation was successful.
Note: For more details regarding the installation process and initial setup, check out our guides for different Ubuntu versions:
2. Start NGINX and Configure to Launch on Reboot
The commands below demonstrate how to start and automatically run NGINX on reboot:
1. Start the NGINX service with the systemctl command:
sudo systemctl start nginxThe command only outputs a message in case of an error or warning.
2. To configure NGINX to launch on reboot automatically, enable the service with:
sudo systemctl enable nginx
The command executes a script to enable NGINX to launch automatically.
3. To check the NGINX server is running, use:
sudo systemctl status nginx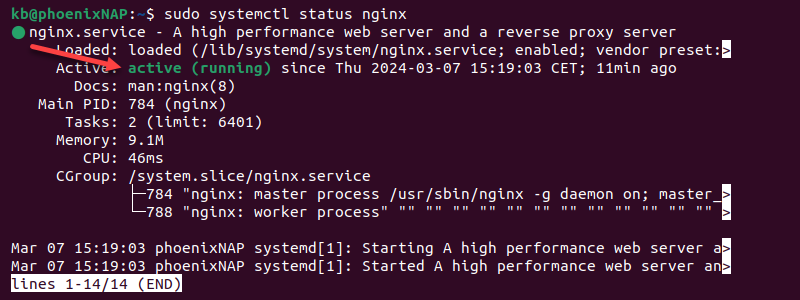
The output shows the service is active (running).
3. Unlink Default Configuration File
NGINX uses the default linked configuration file. Creating a reverse proxy requires creating and linking a custom file. To avoid any potential conflicts, use the following command:
sudo unlink /etc/nginx/sites-enabled/defaultThe command unlinks the default configuration file.
4. Create New Configuration File
Follow the steps below to create a new configuration file:
1. Create a new file in the NGINX /etc/nginx/sites-available directory using an editor, such as Vim:
sudo vim /etc/nginx/sites-available/reverse-proxyAlternatively, use a different text editor, such as nano.
2. Configure the NGINX server to act as a reverse proxy. Add the following configuration to the file as a basic example:
server {
    listen 80;
    server_name localhost;

    location / {
        proxy_pass http://127.0.0.1:8000;
        proxy_set_header Host $host;
        proxy_set_header X-Real-IP $remote_addr;
        proxy_set_header X-Forwarded-For $proxy_add_x_forwarded_for;
        proxy_set_header X-Forwarded-Proto $scheme;
    }
}
The configuration consists of a server {...} block that handles all requests matching the specified conditions. It contains the following data:
listen 80. The server listens for incoming HTTP requests on port 80.server_name localhost. The domain name for which the server block is responsible. The example uses localhost to demonstrate how the reverse proxy works.location / {...}. The configuration for the specified URI path. It matches all requests (/) in this case.proxy_pass http://127.0.0.1:8000. The backend server to which NGINX proxies requests. The example uses the local host address on port 8000 (127.0.0.1:8000) as a replacement backend. Use an actual backend server URL in a realistic scenario.proxy_set_header. The directive for setting HTTP headers for the proxied request. The headers pass to the backend server and provide additional information about the client's request. The example includes the Host header, the client's IP address, and the scheme (HTTP or HTTPS).
Replace the port number, server name, and the backend server with the actual data. The example forwards all requests made to localhost to the http://127.0.0.1:8000 address.
3. Save the file and exit Vim.
5. Link and Activate New Configuration File
Link the new configuration file and active it with the following command:
sudo ln -s /etc/nginx/sites-available/reverse-proxy /etc/nginx/sites-enabled/The /etc/nginx/sites-enabled directory contains configuration files that are currently in use. NGINX actively uses the configurations linked to /etc/nginx/sites-enabled to serve requests without duplicating configuration files in two locations.
6. Test and Restart Nginx
Test the configuration syntax with the following command:
sudo nginx -t
To apply the changes, restart the NGINX server:
sudo systemctl restart nginxThe restart should not output syntax errors, indicating that the NGINX reverse proxy is ready to be tested.
7. Test Reverse Proxy
To test the reverse proxy, do the following:
1. Create a new directory that will contain a test page:
mkdir example_backend && cd example_backendThe command also navigates to the new directory.
2. Make a new file to act as a landing page:
vim index.htmlThe backend server will show the page when a client accesses localhost.
3. Add the following code to the file:
<html>
<head>
  <title>NGINX backend</title>
</head>
<body>
  <h1>It works!</h1>
</body>
</html>
The code is a basic HTML page.
4. Save and close the file.
5. Run the backend server from the same directory as the index.html file using the following command:
python3 -m http.server
The command starts an HTTP server and serves the index.html page.
6. Create a curl request to localhost in a new terminal tab:
curl localhost
Alternatively, access the page from a web browser.

In both cases, the reverse proxy intercepts the client request and forwards it to the backend server. The backend server responds with the HTML page, indicating the NGINX reverse proxy is set up correctly.
Nginx Reverse Proxy: Additional Configuration Options
NGINX offers numerous configuration options that fine-tune the reverse proxy behavior and help optimize performance.
Below are additional configuration options to consider when setting up a reverse proxy. All configurations are directives added to the NGINX configuration file from the previous example.
Proxy Buffers
By default, NGINX uses buffers to temporarily store traffic data during request processing. When acting as a proxy server, it buffers entire requests from a client before forwarding them to the backend server. Buffers ensure NGINX processes and forwards entire requests efficiently.
The primary configuration directives to control proxy buffers are:
proxy_buffering. Controls whether NGINX buffers responses from the proxy server. Possible values areon(default) oroff. Example syntax is:
proxy_buffering on;proxy_buffer_size. Manages the maximum buffer size for individual buffers. Larger buffers improve performance for large responses but also increase memory use. The default value is4k(kilobytes). The syntax is:
proxy_buffer_size 4k;proxy_buffers. Sets the number of buffers and their sizes. For example,3 4kconfigures NGINX to use three buffers of four kilobytes each:
proxy_buffers 3 4k;proxy_busy_buffers_size. Controls the size of all temporary buffers for storing response data. When memory use exceeds this size, NGINX starts discarding or flushing buffers. Use this value to control memory consumption. For example:
proxy_busy_buffers_size 12k;Modifying proxy buffer settings impacts performance, memory usage, and throughput. These settings help reduce response times, especially with large traffic volumes and file uploads.
Request Headers
NGINX provides various directives to control request headers as a reverse proxy. The directives allow adding, changing, or hiding headers before forwarding requests to the backend server(s).
The main directives for managing request headers are:
proxy_set_header. Allows setting or changing request headers before they are forwarded to backend servers. The directive contains two arguments: the header name and its value. For example, to preserve the original Host header, use:
proxy_set_header Host $host;proxy_hide_header. Conceals a specified header from the response before forwarding it to the client. The directive takes one argument, which is the header name. For example:
proxy_hide_header X-Powered_by;proxy_ignore_headers. Ignores one or more specified response headers and does not forward them to the client. The directive allows stating multiple arguments, for example:
proxy_ignore_headers Cache-Control Expires;proxy_pass_headers. Controls which headers received from the backend are passed to the client in the response. For example:
proxy_pass_headers Content-Type;proxy_set_body. Modifies the request body before delivering it to the backend server. It allows adding or changing content in POST requests. For example, to preserve the original request body, use:
proxy_set_body $request_body;The request header directives provide granular control over request headers, which enhances reverse proxy functionality and security.
Load Balancing
Load balancing is a technique for distributing incoming traffic across multiple servers to ensure high availability and optimal resource usage. NGINX uses the upstream module to define backend server groups and allows choosing the load balancing algorithm.
The following example shows a configuration implementing load balancing:
http {
    upstream backend_servers {
        least_conn;  # Load balancing algorithm: least connections
        server backend1.example.com weight=3;
        server backend2.example.com weight=2;
        server backend3.example.com weight=1;
        server backup_backend.example.com backup;
    }
    server {
        listen 80;
        location / {
            proxy_pass http://backend_servers;
        }
    }
}
The example uses the following elements:
http {...}. A top-level block for defining configurations related to HTTP server behavior.upstream backend_servers. Contains backend servers to which requests are load-balanced. The block name isbackend_servers, which is used as a connection reference for the reverse proxy.least_conn. The load balancing algorithm. It distributes requests to servers with the fewest active connections.server backend1.example.com weight=3. The directives define a backend server with a hostname and optional weight. The weight indicates the server receives three times more connections than the other servers in the group.server backup_backend.example.com backup. A fallback server in case all other servers are unavailable.proxy_pass http://backend_servers. Proxy load balancing connection. It forwards client requests to the upstream groupbackend_serversand enables balancing between multiple backend servers.
Caching
Caching is a mechanism for storing frequently accessed data and resources. It helps reduce server load and enhance performance. NGINX implements a caching mechanism using several directives.
The configuration below shows how caching works in NGINX:
http {
    proxy_cache_path /path/to/cache keys_zone=my_cache:10m max_size=10g;

    server {
        listen 80;

        location / {
            proxy_cache my_cache;
            proxy_cache_valid 200 302 10m;
            proxy_cache_valid 404 1m;
            proxy_pass http://backend_servers;
        }
    }
}
The example contains the following directives:
proxy_cache_path. Specifies the path to the cache storage. The directive includes additional parameters to define a shared memory zone (keys_zone) and the maximum cache size (max_size).proxy_cache. Activates the caching mechanism for requests proxied to the backend servers.proxy_cache_valid. Defines the validity period for a cached response based on the HTTP response code. In the example above, responses with the codes200and302are cached for ten minutes, while404is cached for one minute.
Security
NGINX contains various security features to protect communication between clients and backend servers. Implementing security at the proxy level helps enhance web infrastructure security. The directives related to security are in the server {...} block.
Essential security measures to consider when securing an NGINX reverse proxy are:
- Access control. The
allowanddenydirectives enable fine-grained access control. Add specific addresses or networks to control client access to backend servers. For example:
deny all;
allow 192.168.1.0/24;
- Filtering requests. NGINX enables filtering and rate-limiting requests based on various criteria. Create filters based on geographic location (
geo), user agent (map), or request rate (limit_req). - Security headers. Adding HTTP security headers helps defend from common web vulnerabilities. Headers that help secure requests include
Content-Security-Policy,X-Content-Type-Options, andX-Frame-Options. - SSL/TLS termination. Use the reverse proxy as a termination point for clients' SSL/TLS connections. The proxy ensures secure redirection from HTTP to HTTPS using previously installed certificates.
Note: Follow our guide to install an SSL certificate on NGINX.
Benefits of Using NGINX as a Reverse Proxy
NGINX is renowned for improving web server performance, scalability, and security. The main benefits of using NGINX as a reverse proxy are summarized below:
- High performance. NGINX has low resource utilization which makes it ideal for large data volumes and increasing traffic demands.
- Scalability. NGINX scales and caters to traffic increases. It is suitable for both small-scale projects and large-scale infrastructures.
- Simple to configure. The simple configuration syntax makes it easy to configure and manage, which reduces complexity.
- Community support. NGINX has a large and active user community. The extensive documentation has many examples, tutorials, and other supportive resources.
Conclusion
Now you know how to set up an NGINX reverse proxy. This excellent tool for a multi-server environment allows for creating a unified client experience.
Next, learn how to deploy NGINX reverse proxy on Docker.
