Introduction
Java is a popular software platform used to develop and run software applications. Many web-based applications run on Java.
This guide will help you install Java on a Raspberry Pi. Also, the article provides instructions on how to set the default version of Java and specify the default JAVA_HOME path environment variable.
Prerequisites
- A Raspberry Pi 2, 3, or 4
- A user account with sudo privileges
- Access to a terminal/command line
Note on Java and Raspberry Pi
If you’re already familiar with Java and Raspberry Pi, skip ahead to the next section.
There are two main versions of Java:
- OpenJDK – An open-source Java environment, licensed under the GNU General Public License.
- Oracle Java – A paid service that includes support options and licensing.
Important: This guide will help you install the free, open-source OpenJDK version. Oracle Java versions require an account to download, and most are not compatible with Raspberry Pi.
While browsing different Java versions, you may see different abbreviations:
- SE: Standard Edition (usually for Oracle Java)
- JRE: Java Runtime Environment (for running Java applications)
- JDK: Java Development Kit (for writing and running Java applications)
- LTS: Long-Term Support (major software versions intended for long-term use)
Installing Java on Raspberry Pi
By default, Raspberry Pi uses the Raspbian operating system. Raspbian is based on Debian, so terminal commands to install Java will use the apt package manager.
It is recommended that you install all packages from the default Raspbian software repositories. Raspberry Pi’s system architecture is ARM-based so many packages aren’t compatible.
Install OpenJDK Java 11 on Raspberry Pi
The default Raspbian repositories have a fully-updated and compatible version of OpenJDK.
1. In a terminal window, enter the following:
sudo apt update
sudo apt install default-jdk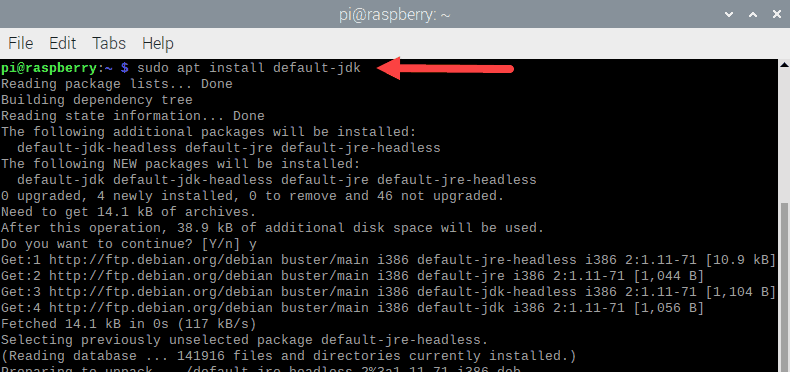
The first command updates your package repositories to use the latest software. The second command installs Java.
2. If prompted, type Y , and press Enter to allow the process to complete.
3. You can verify the installation by checking the software version as follows:
java –versionThe system will display the software version. It should display something similar to:

Your version may vary, depending on the latest Java version available.
Install OpenJDK Java 8 on Raspberry Pi
1. To install OpenJDK 8, enter the following in a terminal window:
sudo apt update
sudo apt install openjdk-8-jdk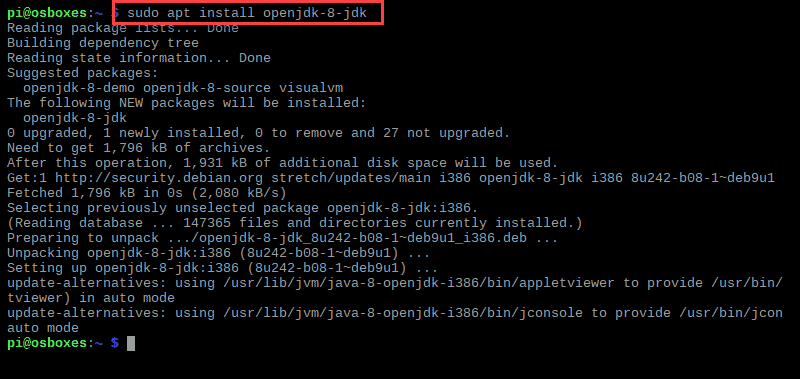
The first command updates the list of software packages in your repositories. The second command installs Java OpenJDK 8.
2. If necessary, type Y and hit Enter to confirm and allow the process to complete.
3. You can verify the installation with:
java –versionThe system will display the software version. It should display something similar to:

Note: If you have installed Java 11 prior to installing Java 8, the system will display the version of your Java 11 instance. That is because the system defaults to using the latest Java version.
Move on to the next section to set the default Java version manually.
Set Default Java Version (Optional)
If you have installed both OpenJDK 8 and 11, your default version will probably be the latest version (OpenJDK 11). You can check your system’s default Java version with:
java –version1. To manually set a different Java version, start by running the following command:
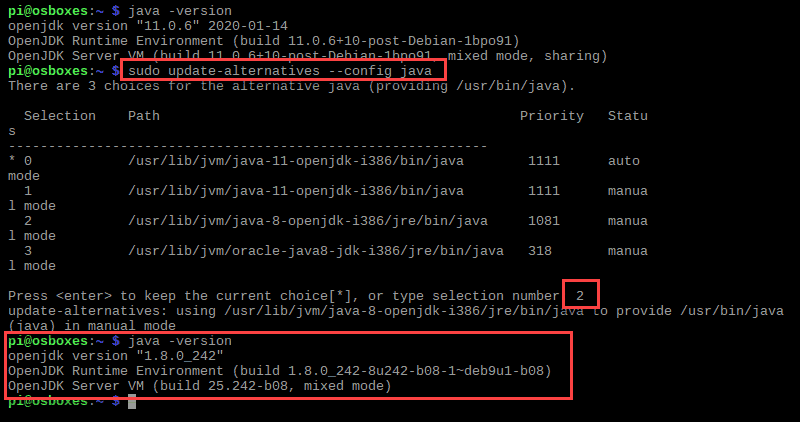
sudo update-alternatives --config javaThe output will list out all installed Java instances on your Raspberry Pi system.
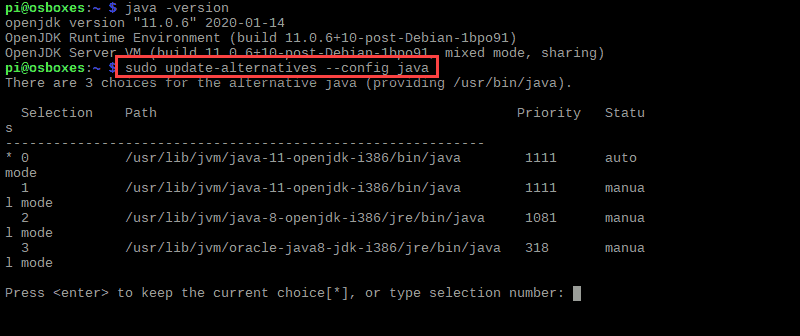
2. The default version will have a * next to it. Type a selection number and hit Enter to set a different Java version as the system default.
For further details, see example below:
Set JAVA_HOME Path Environment Variable (Optional)
Once you have set your Raspberry Pi’s default version of Java, you can set the JAVA_HOME path environment variable.
Note: Applications compiled in Java (e.g., Apache Tomcat) use the JAVA_HOME path environment variable to access your Java’s installation path. If not configured, you may receive a “[fail] no JDK found” error.
1. Start by finding the location of your default Java instance:
sudo update-alternatives --config javaOn any Raspberry Pi system, the default locations are usually:
- OpenJDK 11 path –
/usr/lib/jvm/java-11-openjdk-armhf/bin/java - OpenJDK 8 path –
/usr/lib/jvm/java-8-openjdk-armhf/jre/bin/java
2. Next, edit the /etc/environment file:
sudo nano /etc/environment3. Add the following to the file:
JAVA_HOME="path_of_your_default_version_of_java"For example, for OpenJDK 8, you should insert:
JAVA_HOME="/usr/lib/jvm/java-8-openjdk-armhf/jre/bin/java"4. Save the file and exit the text editor.
5. Now reboot your system for the changes to take effect:
sudo reboot6. Verify the changes by running the following command:
echo $JAVA_HOMEThe output should return the JAVA_HOME path defined in the /etc/environment file.
Note: The /etc/environment file is a system-wide configuration file. Anything defined in the file will affect every user on the system. To configure the path environment variable for a single user, insert the line in the .bashrc file.
Uninstall Java on Raspberry Pi
By following this guide, you have installed Java 8 and/or Java 11 using the apt package manager. You can also uninstall Java on Rasperry Pi using apt.
To uninstall Java 8 on your Raspberry Pi system, run the following command:
sudo apt remove openjdk-8-jdkPress Y and hit Enter to confirm and wait for the process to complete.
To uninstall Java 11 on your Raspberry Pi system, run the following command:
sudo apt remove default-jdkPress Y and hit Enter to confirm and wait for the process to complete.
Conclusion
This tutorial showed you the necessary steps to install Java 8 and Java 11 on a Raspberry Pi. You should now have a working installation of OpenJDK 11 and/or OpenJDK 8 on your Raspberry Pi.
The article also guided you in setting the default version of Java in use and defining the JAVA_HOME path environment variable. For more similar tutorials, refer to our guides How To Set Environment Variables In MacOS or How To Set Environment Variables In Linux.