Introduction
Server Blocks, often referred to as Nginx virtual host are a feature of the Nginx web server that allows you to host multiple websites on one server. As opposed to setting up and configuring a server for each domain, hosting a number of websites on a single machine saves both time and money.
Domains are isolated and independent, each having a separate:
- Directory for site documentation
- Website security policy
- SSL certificate
In this tutorial, learn how to set up Nginx server blocks and configure a local host file on CentOS 7.

Prerequisites
- A CentOS self-managed server or VM
- Nginx installed on the system
- A user with sudo privileges
Note: If you do not have an Nginx web server, refer to our guides on how to install and configure Nginx on CentOS 7 or how to install and configure Nginx on CentOS 8.
Setting Up Virtual Host / Server Blocks on CentOS
Step 1: Create Directory Structure
The Nginx virtual host can foster multiple websites on a single machine. As each website has individual site documentation, you need to create individual directory structures to store the data.
Each server block should have a directory inside the document root (the /var/www directory).
This guide shows you how to create virtual hosts for two servers (website1.com and website2.com). You can adjust the configuration and tailor for your respective resources.
1. Start by using the following command to create a folder inside the /var/www directory with the command:
sudo mkdir -p /var/www/website1.com/html2. Then, create one for the second website by typing:
sudo mkdir -p /var/www/website2.com/html
3. Next, change the ownership of the files so other users can add, delete or modify files in the directories. As a result, both directories will belong to the user you are logged into.
4. Use the chown command change file ownership:
sudo chown -R $USER:$USER /var/www/website1.com/html5. Repeat the process for the second web directory (making sure to change the domain name) by typing:
sudo chown -R $USER:$USER /var/www/website2.com/html6. Finally, grant reading permission to all the files inside the /var/www directory using the chmod command:
sudo chmod -R 755 /var/www
Step 2: Create a Demo Page for Virtual Host
The following step is to create the content you want to display on the websites hosted on Nginx server blocks. The easiest way to illustrate the process would be to create an index.html page for the two previously mentioned domains.
1. Use a Linux text editor of your choice to create and open the index.html file for the first website. In this example, we used Vi (but Nano or any other works fine as well):
vi /var/www/website1.com/html/index.html2. Once a blank Vi page opens, press i (to insert) and add the following content:
<html>
  <head>
    <title>Welcome to our first website!</title>
  <head>
  <body>
    <h1>Great work! You have created the website1.com server block.</h1>
  <body>
<html>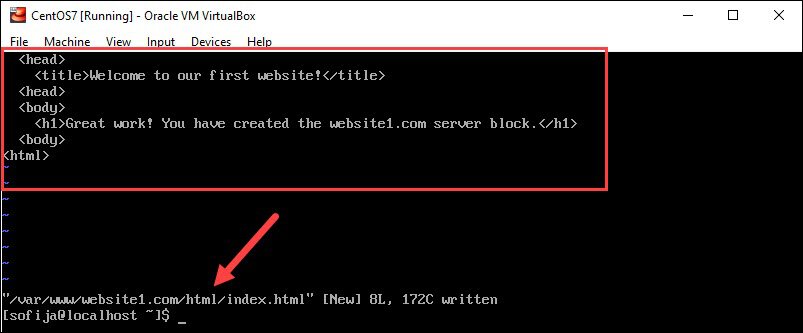
3. Then, save and exit the first file.
4. Repeat the steps for the second domain. But, remember to modify the file name to website2:
vi /var/www/website2.com/html/index.htmlAlso, add content similar to the previous step, but change the specifics to match the second domain:
<html>
  <head>
    <title>Welcome to our second website!</title>
  <head>
  <body>
    <h1>Great work! You have created the website2.com server block.</h1>
  <body>
<html>
Again, save and exit the file.
Step 3: Set Up Environment for Server Block Files
Before we set up virtual hosts for the two domains, we need to create two directories:
- Sites-available directory to store the server blocks in.
- Sites-enabled directory that will tell Nginx which links to publish and which blocks share content with visitors.
1. Use the mkdir command to create the new directories using the commands:
sudo mkdir /etc/nginx/sites-availablesudo mkdir /etc/nginx/sites-enabled
2. Then, open the Nginx configuration file and modify it by adding the sites-enabled directory:
sudo vi /etc/nginx/nginx.conf3. Inside the http block, add the following two lines:
include /etc/nginx/sites-enabled/*.conf
server_names_hash_bucket_size 64;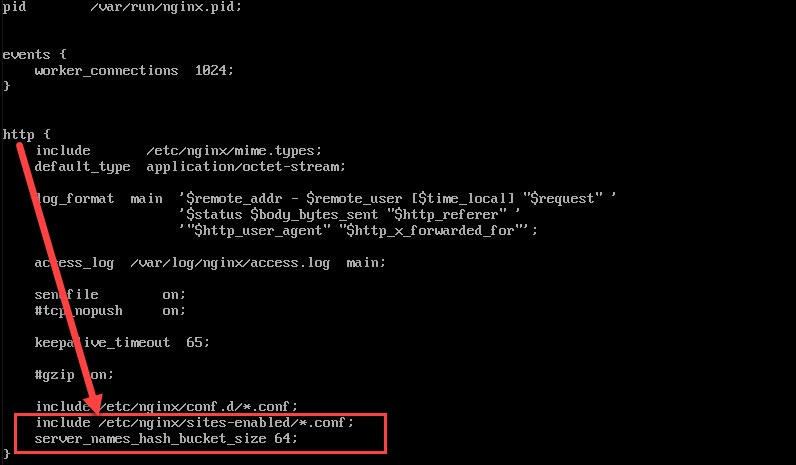
While the first line instructs Nginx to check the sites-enabled directory, the second increases how much memory is reserved for examining multiple domain names.
4. Save the file and exit.
5. Verify the Nginx configuration file after making any kind of alterations to ensure the syntax is correct. Doing so can help avoid possible errors in the future.
Test the file with the following command:
sudo nginx --tIf the syntax is OK, the output tells you the test was successful, as in the image below.

However, if it finds an issue in the syntax, the output specifies where the mistake is and how to go back and correct it.
Step 4: Create Server Block Files
The Nginx web server package comes with a default server block under the name default.conf. As you need to create server blocks for each domain, the easiest way to do so would be to copy the existing template and modify the specifications.
1. Create a virtual host for the first website with the cp command to make an exact copy of the file:
sudo cp /etc/nginx/conf.d/default.conf /etc/nginx/sites-available/website1.com.conf2. Open the cloned file with a text editor with the following command:
sudo vi /etc/nginx/sites-available/website1.com.confThe content of the file should appear as in the image below:
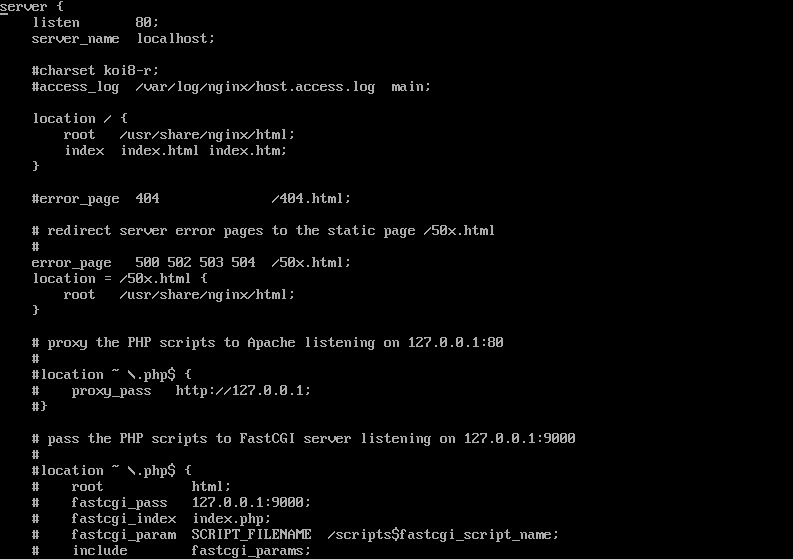
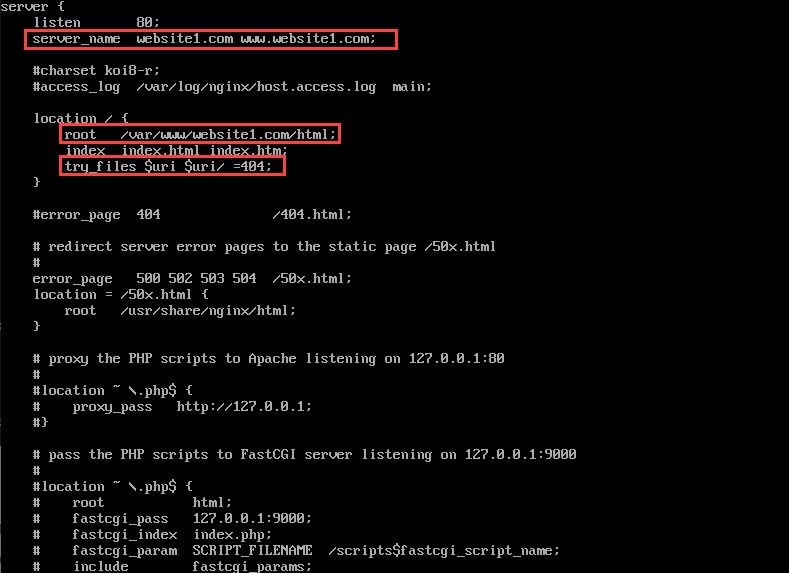
3. There are three (3) lines you’ll need to edit in the file:
- The server_name should correspond to the domain name of your first website. Make sure to include the address with and without the www. prefix. By doing so the server will recognize both types of requests from visitors and redirect them to the same content.
In our example, the server_name would therefore be:
server name website1.com www.website1.com;- Modify the root directory to coincide with website1.com using the command:
root /var/www/website1.com/html;- Add a try_files command with a 404 error for instances when the server receives requests for untraceable files and directories:
try_files $uri $uri/ =404;Make sure to save the file before exiting. After all the changes have been made, the configuration file will appear as follows:
4. Repeat the process for the second server block while changing the details to correspond to website2.com.
This includes copying the default configuration file with the command:
sudo cp /etc/nginx/conf.d/default.conf /etc/nginx/sites-available/website2.com.confFollowed by opening a file with a text editor:
sudo vi /etc/nginx/sites-available/website2.com.confEdit the content in the following manner:
server name website2.com www.website2.com;try_files $uri $uri/ =404;root /var/www/website2.com/html;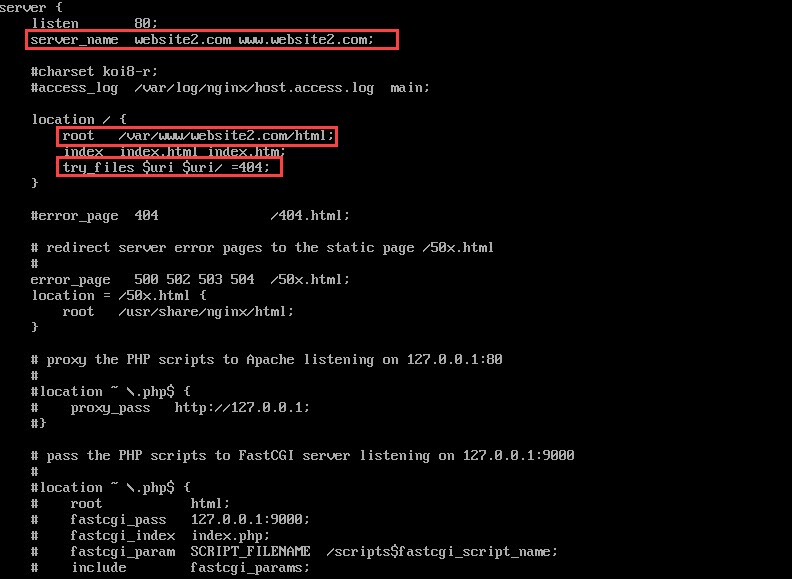
Step 5: Enable Server Block Files
To enable the virtual host files, create symbolic links in the sites-enabled directories with the commands:
sudo ln -s /etc/nginx/sites-available/website1.com.conf /etc/nginx/sites-enabled/website1.com.confsudo ln -s /etc/nginx/sites-available/website2.com.conf /etc/nginx/sites-enabled/website2.com.conf
For the changes to take place, make sure to restart Nginx:
sudo systemctl restart nginxStep 6: Configure Host File
If you’ve used the example domains instead of functioning ones, modify the hosts file to redirect requests to the virtual private server (VPS) you have created.
1. Open the host file in a text edior:
sudo vi /etc/hosts2. Edit the following two lines under the existing content, while specifying the VPS IP address:
ip_address website1.com
ip_address website2.com
3. Save and exit the file.
Step 7: Verify Server Blocks Setup
To verify the setup of the server blocks, navigate to the websites you’ve created to host on the server blocks.
Open a browser and type in the URL of the first domain:
www.website1.com
www.website2.com
You should see the content created for the demo page in Step 2.
Conclusion
After reading this article, you should understand the basic principles of installing and setting up Nginx server blocks for hosting multiple domains on CentOS.
Although Nginx is easy to use, it does have a limited number of features. If you require more from your web server, you may want to consider installing Apache on CentOS 7.